HS-M80 Quick Installation Guide
Quick Installation Guide

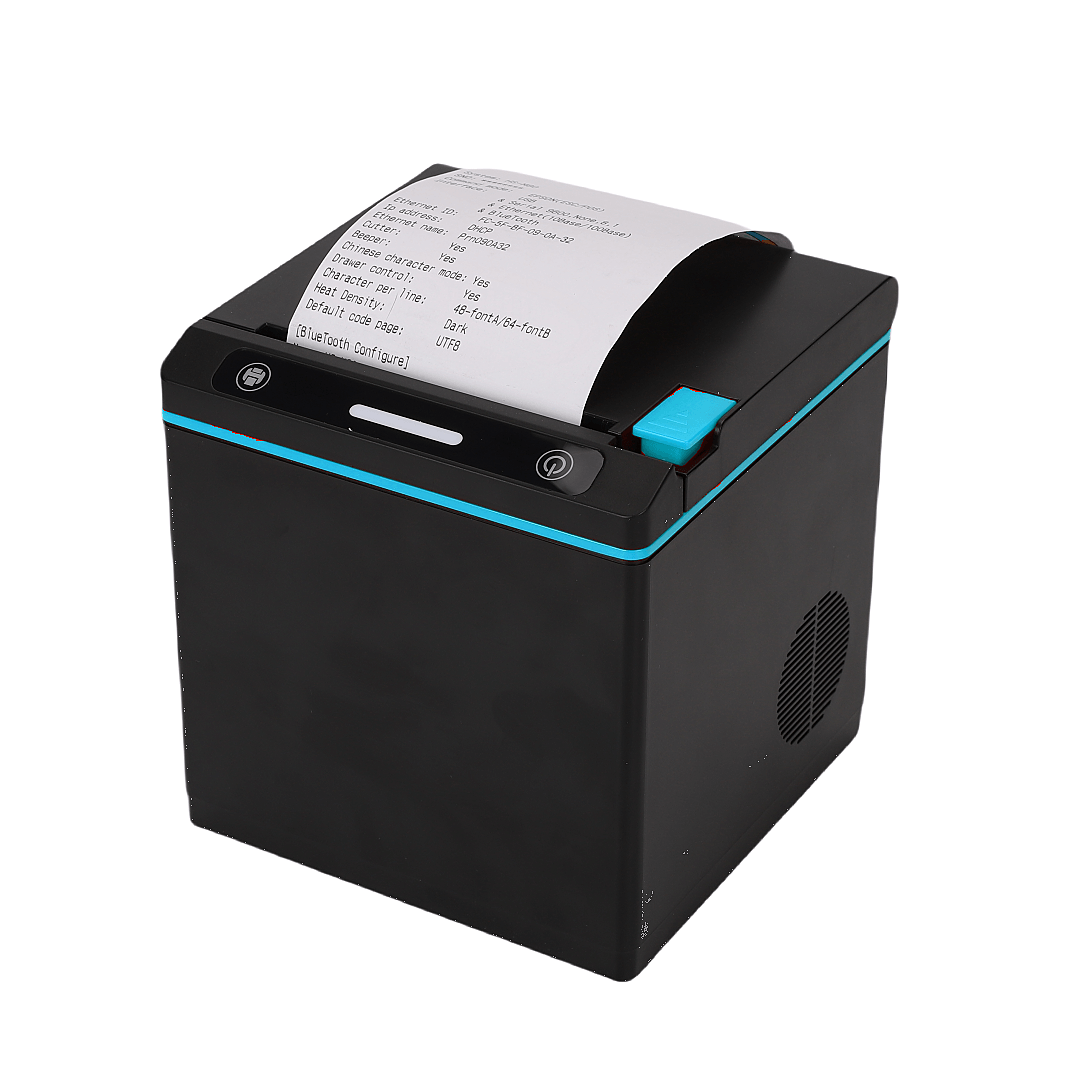
HS-M80&HS-KH80 Series, HS-KL80 Series
IMPORTANT
Before using this product, make sure you read these instructions and the safety instructions in the Notices sheet.

Note: The illustrations show the HS-M80, but the steps are the same for all models, unless otherwise specified
Connecting Cables

Loading Paper / Charger le papier
You can print on 80 mm or 58 mm wide paper. If you load 58 mm wide paper, install the roll paper guides as shown below. See the online manuals for additional paper loading information.

Roll Paper Guides
Top Feed

Front Feed

Plugging the Printer In


General button function
Paper feed
When the printer is ready,press the feed key,then the paper will moveing. Press 2 time feed key, it will be print the self-test page.
power on
the printer will be Power on, when connected the power adapter, Keep press the power key, the printer will be turn off. Keep press the power again will be turn on.
Connecting to a Wi-Fi® Network
Note:
• Wi-Fi connectivity not available for all models.
• To view a Wi-Fi setup video, scan the QR code.
1, Get SimpleAP Start printout:
Keep press the feed key and power on until print a self-test page, A SimpleAP Start page prints.

2, Scan QR code:
Using the iphone QR code reader, sanning the qr code and it will be open the pages as below:
Type your WIFI’s SSID and password to join the network. After connected the wifi, the printer will print out the ip address.

After you scan the SampleAP QRCODE, it not open the WIFI Configuration page, you also can use the cellphone to connected the SimpleAP “Printer” and password:”1234578”. After connected the SimpleAP, you can open the “Browser” and type the IP address “192.168.43.1” to open the WIFI Configuration page to set your WIFI.

Notice: the printer printed the SimpleAP pages, Pls Finish Configuration wifi setting during 5 minutes. The SimpleAP will be closed Automatically after 5 minutes. After the WIFI is connected successful, the SimpleAP will be closed Automatically.
Using the windows tools to set the WIFI,
1, Connected the printer with your windows by usb or Ethernet Cable,
2, Open the “PrinterSettingTools.exe”----choose the port which you connected with windows.
And to click the “checkport(Print self test page)” button, If the printer print a self-test page , that means Communication is working.

You can click the “Enter Para Setting”---choose “WIFI”Option------type your wifi SSID , and choose “WPA-PSK/WPA-PSK2”-----type your wifi key(password)------click set.
After setting, the printer will be restart and printing the IP address info, than means the wifi is working.
Notice: after setting, the printer not print the ip address, that means printer not connected to your WIFI network. You need to check your wifi SSID and password again.
Using the android & IOS Tools Set the WIFI
1, you can use your android&IOS cellphone to scanning the qrcode to download the “PrinterSettingTools” From APP Store.

Android (PrinterSettingTools) IOS (PrinterSetTools)
2, open the “PrinterSettingTools”----connected the Bluetooth printer-----type the Bluetooth password”0000”-----Click “Settings”----choose “WIFI”Option---the apps will be read your wifi which connected with your cellphone----you only need type your wifi password----click “Set WIFI”---The printer will restart again and the printer will printed out the ip address info.
Notice: after setting, the printer not print the ip address, that means printer not connected to your WIFI network. You need to check your wifi SSID and password again.
Making a Bluetooth® Connection

Note:
• Bluetooth connectivity not available for all models.
• To view a Bluetooth setup video, scan the QR code.
, Turn the printer on, the Bluetooth will be online, you can use cellphone or tablet to searching the Bluetooth printer name. default Bluetooth name is “HS-M80”, Each model Bluetooth name is different, please refer to the name on the self-test page. Default Password is “0000”
Technical Support / Soutien technique
Visit https://www.hsprinter.com/en/Download.htmlto download drivers, access manuals, or contact HSPOS Call (+86 0760-85402097, 8 a.m. to 6 p.m., CST Time, Monday through Friday. Days and hours of support are subject to change without notice. Toll or long distance charges may apply.
warranty terms
1、The guarantee life of the print head of this printer is 100KM, and the warranty time of other parts is 12 months from the date of purchase;
2、If the following circumstances are occured,no warranty is provided;
2.1、Disassemble the product without the permission of our company and authorized maintenance personnel, or the product serial number label is torn off or blurred and cannot be recognized
2.2、The print head is not guaranteed if the white line is caused by the scratch of the thermosensitive print head by solid particles;
2.3、Other faults caused by user.
3、During the warranty period, the replacement parts of the products belong to our company; 4、The user needs to send the products to our after-sales service department or our authorized repair station.
Warranty Card
Please fill in the following information carefully when purchasing the machine and keep it properly
|
User name |
|
Mobile phone |
|
|
Wholesaller |
|
Mobile phone |
|
|
Printer name |
|
Purchase date |
|
|
Printer model |
|
|
|
|
User address |
|
|
|
|
Wholesaler address |
|
|
|
|
Please describe the problem |
|
|
|
Why Is Your QR25 Embedded Thermal Printer More Expensive? Unveiling the Hidden Differences in Internal Structure Despite Similar Appearance
Can Thermal Printers Print Customer Logos on Receipts?
Related Posts

The Ultimate Guide to Android-Compatible Barcode Printers in Australia & Canada: Reliable Hardware for Shopify & DoorDash

Multi-Platform Integration: Connecting Your 14-inch POS to Shopify, Square, and UberEats

The Future of AI Weighing: How Smart Scales are Transforming Grocery Checkout in 2026

The 2026 Master Guide to Setting Up Multiple Delivery Tablets with the HS-M80 (TP-M30)

Ending the 'Ghost Order' Nightmare: Why Your Kitchen Needs Industrial Concurrency

The Multi-Tablet Revolution: How to Connect 7 Food Delivery Devices to One Bluetooth Printer

The Heavy-Duty Advantage: Why Manual Push-Open Cash Drawers are the Unsung Heroes of Retail Stability
